Planning joins and seams
 Audio for slide 1 (mp3 |6|KB)
Cross joins occur where two ends meet - that is, where one roll finishes and the next one begins.
Although flooring installers try to minimise the number of seams and joins used, they are unavoidable in large rooms, angled areas and in doorways between rooms.

 Audio for slide 2 (mp3 |6|KB)
This not only allows you to plan where they'll go, it also lets the client approve their position before you proceed with the installation.
You especially need to involve the client when there's a choice between a layout that has the best appearance and an alternative that is more cost-effective.
 Audio for slide 3 (mp3 |6|KB)
Here are some basic guidelines on where to position seams and joins:
- Traffic should travel along the seams wherever possible. When traffic goes across a seam it tends to cause more wear and tear.
- Strong light sources should run in the same direction as seams. Try to position seams so that they run towards windows and full length glass doors.
- Carpet pile should always lie in the same direction on both sides of a seam. The direction should also face the main entry where possible.
 Audio for slide 4 (mp3 |6|KB)
Effect of seam direction on material quantities
Let's take a simple example to see what effect the seam direction will have on the quantity of material needed to cover a floor.
Say you have just measured up the room shown at left, and the dimensions are:
Length: 3850 mm
Width: 2700 + 150 (doorway) = 2850 mm
 Audio for slide 5 (mp3 |6|KB)
First, let's run the seam lengthwise. You can see that this will require two runs of 3850 mm, with a large off-cut on one run.
We'll also need to add a trim allowance of 100 mm at the end, which will make the length of each run:
3850 + 100 = 3950 mm.
 Audio for slide 6 (mp3 |6|KB)
'Lineal' means 'in a line', so lineal metreage is the total number of metres needed if you measured it in a continuous line.
Firstly, we have to covert the millimetres to metres:
3950 mm = 3.950 m
Then we multiply the length of each run by the number of runs to find the lineal metreage:
3.950 x 2 = 7.9 l/m.
 Audio for slide 7 (mp3 |6|KB)
Let's now start again, and change the direction of the runs so the seam travels across the room.
This time the total lineal metreage will be:
2700 + 100 (trim allowance) + 150 (doorway) = 2950 mm = 2.95 m
2700 + 100 (trim allowance) = 2800 mm = 2.80 m
5.75 l/m
That's quite a saving in material.
 Audio for slide 8 (mp3 |6|KB)
This will have the effect of making the seam more obvious, especially when the light is streaming in during the day.
So now you've got a compromise to make. Do you go for the cheapest option, or the one that will hide the seam better?
In cases like this, you should advise the client on the pros and cons of both options and let them decide!
 Audio for slide 9 (mp3 |6|KB)
For example, if you're doing several rooms, or there are built-in wardrobes or pantries to cover, you may be able to use the large off-cuts elsewhere.
So you should weigh up these factors when you're deciding which way to go.

Learning activity
Audio 10 (mp3 |6|KB)The calculations in the above examples are pretty simple, so you could do them in your head or with pencil and paper. When you get onto the more complex calculations shown later in this unit, you'll need to use a calculator.
If you're not familiar with how to use a calculator, and in particular, how to use the memory button, go to the following lessons from the unit: Make measurements:
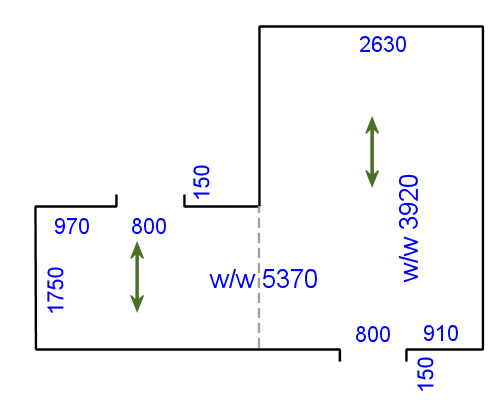
The plan shown below is an example for you to work out. The seam is marked with a dotted line. The direction of each run is shown with a green arrow. You will be using a 300 cm wide roll of vinyl.
How many lineal metres of sheeting are required for this job?