

Applying the coating
 Audio for slide 1 (mp3 |6|KB)
The main differences between systems relate to the mixing methods, drying times, sanding between coats and the personal protective equipment required.
The first step is to isolate the area from all building occupiers, pets and any nearby activity that might allow water, dust or other contaminants to enter.

 Audio for slide 2 (mp3 |6|KB)
Below is a description of the general application process.
However, you should always follow the manufacturer's instructions, because there may be specific techniques that apply to particular products.
 Audio for slide 3 (mp3 |6|KB)
Cleaning the floor
Before you start, the floor must be completely free from dust, dirt and other contaminants.
Make sure you vacuum right into corners, cracks and any other recesses.
Also wipe off any surfaces that may have gathered dust during the sanding process, such as window sills, picture rails, skirtings, power points, light fittings and handrails.
 Audio for slide 4 (mp3 |6|KB)
Having said that, you need to avoid creating a draught that might allow contaminants to blow in from outside.
Check that the lighting is good, and that the floor will be well lit for the full duration of the activity.
This could mean setting up extra floodlights at the outset, so they'll be ready to turn on when needed.
 Audio for slide 5 (mp3 |6|KB)
The manufacturer will indicate whether a sealer is recommended and what the best products are.
Sealers are often used to enhance the depth of colour in the floor and to reduce the risk of edge bonding.
The application method is generally the same as for the main coat.
 Audio for slide 6 (mp3 |6|KB)
Mixing the product
Depending on the type of coating, you may need to mix two parts together or simply stir a one-pack solution until it is well mixed.
Keep stirring until all solids are blended through the body of the liquid.
But be careful not to stir too quickly or roughly, because this could introduce air bubbles which could affect the final finish on the floor.
 Audio for slide 7 (mp3 |6|KB)
Cutting in around the walls
Do the cutting in first, because this will let you walk around on the body of the floor.
Use a clean, good quality brush to cut in around the perimeter walls and in difficult to access places.
Extend the coating out about 150 mm from the wall, so that the applicator will be well clear of the skirtings and obstructions when you do the main body of the floor.
If any bristles fall out of the brush into the finish, remove them immediately so they don't get stuck as the coating dries.
 Audio for slide 8 (mp3 |6|KB)
Using the applicator
There are various techniques used to apply floor finishes.
The manufacturer will specify the most appropriate applicator for the product you're using, but contractors commonly use a mohair roller with a 6 mm pile or nap.
The nap of a roller is the fuzzy material bonded to its core.
A 'short nap' of 6 mm doesn't hold as much coating product as longer naps, but it produces a thin, smooth finish, which is just what you want for a floor coating.
 Audio for slide 9 (mp3 |6|KB)
For most products, a roller and tray are used in the same way as you would for painting a wall.
Some people call this the 'lay on lay off' technique:
- lay on the coating in a reasonable thickness, without worrying too much about grain direction or roller marks
- lay off the coating by rollering the area you've already covered, working in the direction of the grain and smoothing out any ridges.
 Audio for slide 10 (mp3 |6|KB)
Filling and stopping
Any nail holes and cracks that haven't already been filled should be filled, or 'stopped', once the first coat is dry.
Use a clean-bladed putty knife or applicator to push the filler fully into the hole.
Leave it slightly overfull and clean off any excess on the surrounding floor.
The raised surface will be sanded flush when you sand the floor prior to the next coat.
 Audio for slide 11 (mp3 |6|KB)
Sanding and cleaning
The first coat typically causes the timber grain to rise and give it a slightly furry feel.
The amount of roughness depends on the timber species and type of finish being applied.
To remove this roughness, you'll need to sand the floor with a rotary sander or an equivalent machine.
The sand paper should be 150 grit or finer.
Make sure you avoid cutting back to the bare timber - all you want to take off is the raised grain, not the coating itself.
 Audio for slide 12 (mp3 |6|KB)
In addition to smoothing the surface, sanding also improves the 'key' for the second coat.
This helps the new coat to bond to the surface of the first coat.
 Audio for slide 13 (mp3 |6|KB)
You can also use a tack rag to remove any dust left behind by the vacuum cleaner.
 Audio for slide 14 (mp3 |6|KB)
Second and third coats
Most manufacturers recommend three coats for their products.
The process is exactly the same for each coat - apply the product, wait for it to dry, lightly sand the surface, clean the floor thoroughly, then apply the next coat.
Solvent-based systems tend to require heavier grit sandpaper than water based and oil based products, but the manufacturer will provide this advice in their guidelines.

Learning activity
Audio 15 (mp3 |6|KB)We've covered the processes involved in calculating coating volumes in the following lessons from other units in the Flooring Technology resource:
- 'Estimating quantities' - Subfloor coatings and toppings
- 'Primers and adhesives' - Planning and costing.
You'll recall from these lessons that the formula for working out the amount of coating product needed to cover a floor is:
Area of floor (m2) ÷ coverage of product (m2/L) = volume required (L)
Choose a specific floor finish and look up its rate of coverage. Calculate how many litres will be required to apply the recommended number of coats to the floor area shown below.
Write up the following information in your workbook:
- Total floor area in square metres.
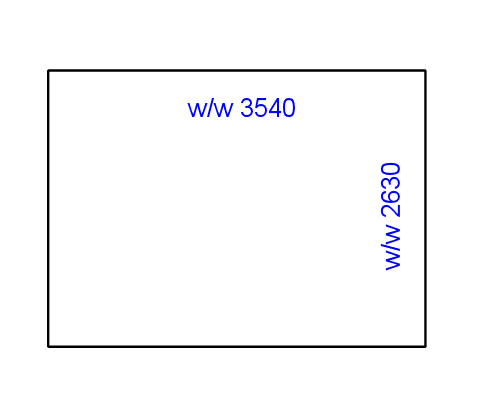
- Product name and manufacturer.
- Coverage in m2/L (state the range, if upper and lower rates are provided).
- Number of coats recommended by the manufacturer.
- Estimated total volume of coating product required to finish the floor, expressed in litres.
- Number of containers required, based on the sizes available for that product.